Working with Data Archival and Data Retrieval
Role : Administrator
This section covers the following topics:
Data Archival is the process of transferring data from primary storage to secondary storage for long-term retention. Data retrieval involves accessing and retrieving the archived data as needed based on specific requirements.
The Data Archival feature enhances system performance and ensures compliance with record retention policies by removing outdated records from your production database. This data is then securely relocated to secondary storage hosted within the same cloud landscape.
• Data Archival is only available only for cloud deployments.
• Ivanti recommends storing no more than 24 months of inactive data in production.
• Audit tables are not supported for Data Archival.
•The feature archives only records that the application can delete.
Before initiating the data archiving process, Ivanti recommends considering the following:
•Irreversible Archiving: Once the data is archived, it cannot be restored to its original form. Retrieval can only be done through the designated retrieval page.
•Related Records: When you archive a parent record, all related records are archived as well, irrespective of their current state. For instance, archiving a service request record will also archive associated child data, including journals, tasks, events, and more.
•Data Privacy: Before archiving data, ensure that sensitive or personally identifiable information (PII) is either securely deleted or anonymized to align with your organization's privacy regulations.
•Retention Policy: Archived data is stored in secondary storage from the moment of archiving onwards and will adhere to Ivanti's Data Retention Policy.
To enable data archival:
1. From the Configuration console, click Build > Extend > Data Archive and Retrieve to view the Data Archive and Retrieve workspace.
2. Click Enable Data Archiving toggle button to enable data archival.
To view general information:
1. From the Configuration console, click Build > Extend > Data Archive and Retrieve to view the Data Archive and Retrieve workspace.
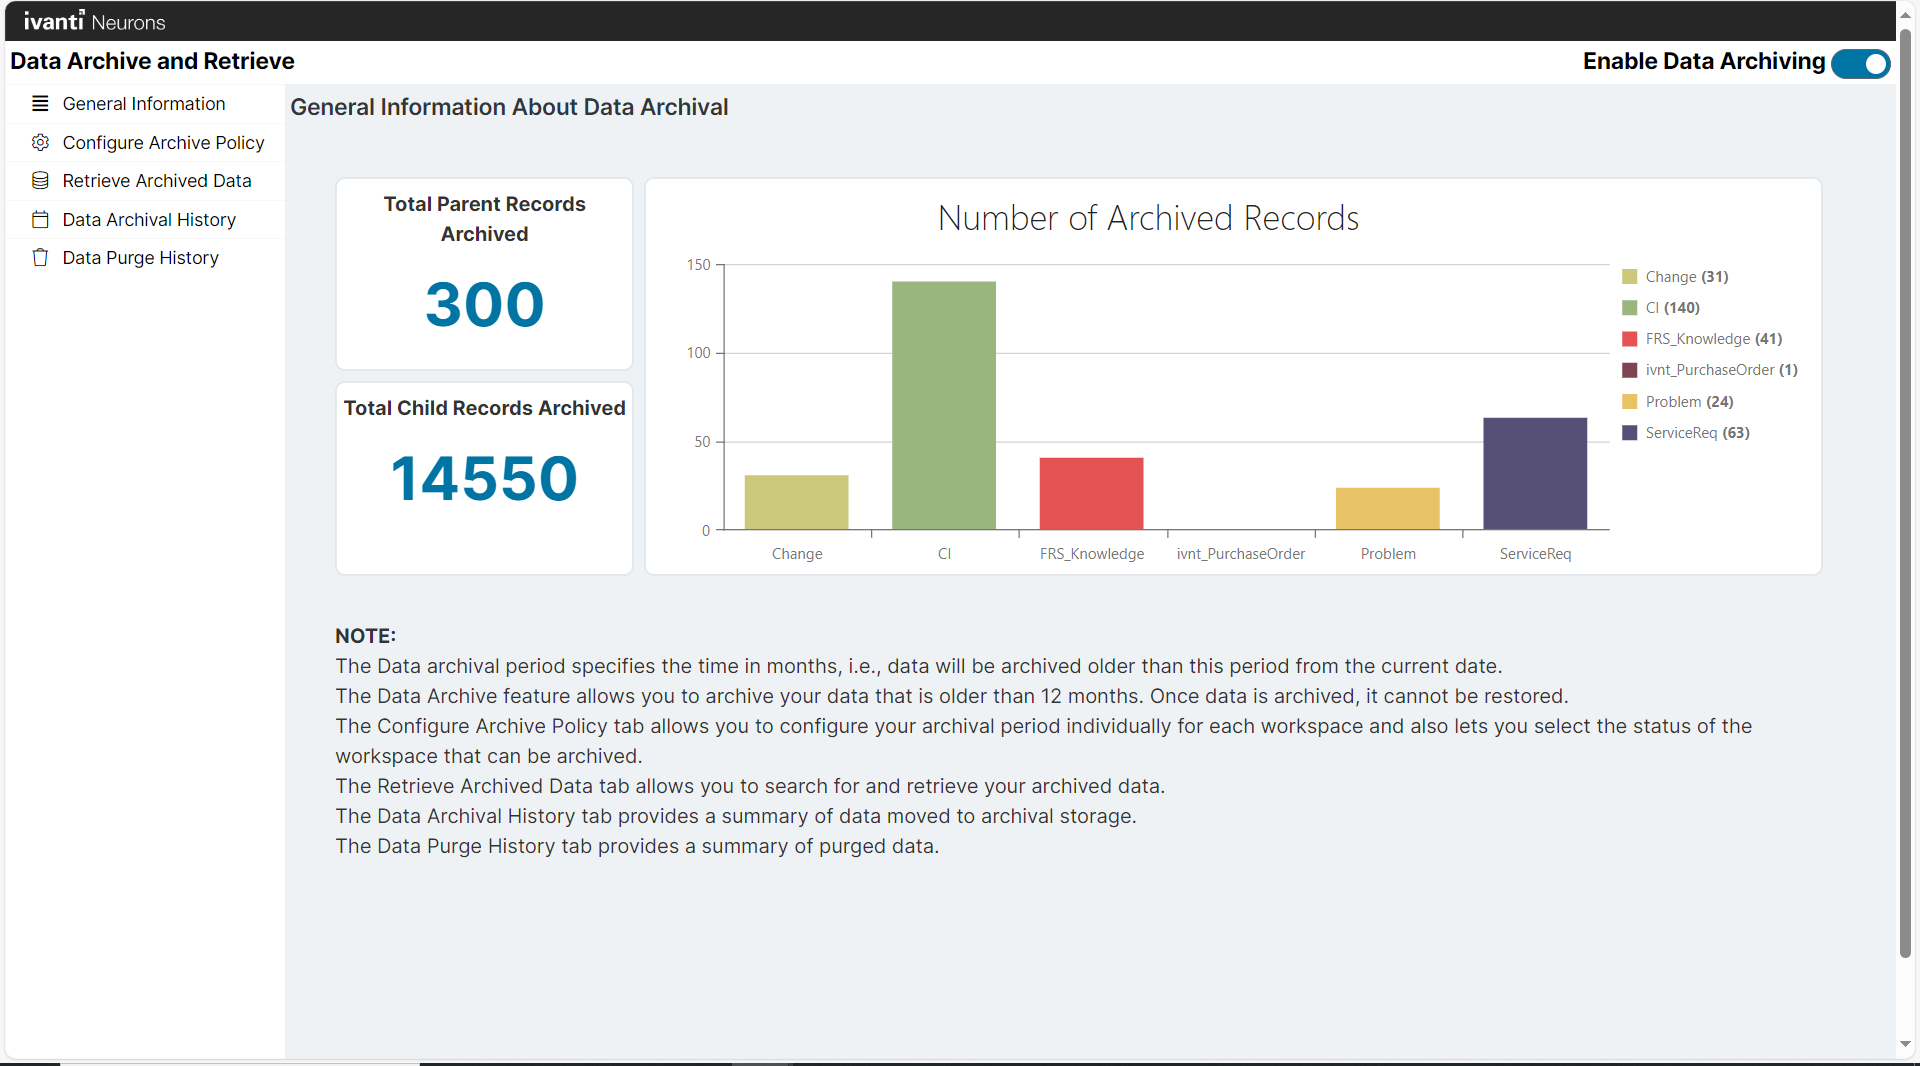
2. Click General Information. The General Information About Data Archival page displays the number of archived records, total parent records archived, and total child records archived.
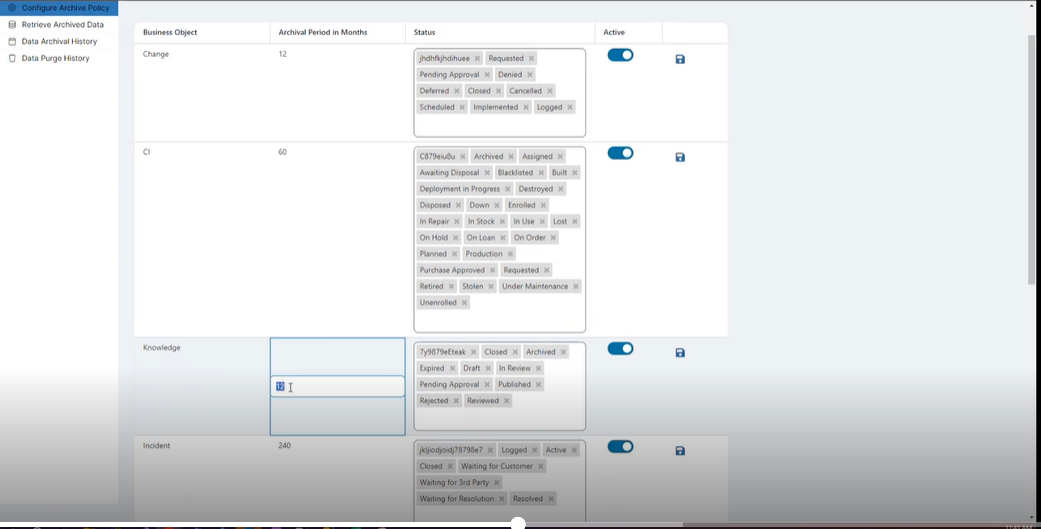
Use the Configure Archive Policy page to perform the following actions:
• Set the archival period individually for a specific business object (BO).
• Define the status for a business object. Choose from predefined status options available Out of the Box (OOTB), or create custom statuses tailored to your business needs.
Additionally, you can:
• Enable or disable individual archival policies. For instance, if you only want to archive incidents, you can turn off other BOs and activate specific archival policies.
• Default high-level policies are provided, but you can customize archival policies based on your specific requirements.
Use ![]() to
enable or disable policies, and click
to
enable or disable policies, and click
![]() to save your archival settings.
to save your archival settings.
Currently, the following Business Objects support Data Archival.
•Change
•CI
•Incident
•Service Request
•Problem
•Purchase Order
•Knowledge
•HR Case
To configure an archive policy:
1. From the Configuration console, click Build > Extend > Data Archive and Retrieve to open the Data Archive and Retrieve workspace.
2. Click Configure Archive Policy. The Configure Archive Policy page appears.
3. Set the archival period, status , or enable or disable the archival policy for business objects based on your requirement.
4.
Click
![]() to save the archival settings.
to save the archival settings.
The Data Retrieval tab allows you to easily access and retrieve your archived data. It provides a convenient way to search for specific files or information within the archive and retrieve them as needed.
To retrieve archived data:
1. From the Configuration console, click Build > Extend > Data Archive and Retrieve. The Data Archive and Retrieve page appears.
2. Click Retrieve Archived Data.
3. Select the business object from the Select BO to Retrieve drop-down list.
4. Under Search Context, select the search criteria. The following search options are supported:
•Keyword: executes a search based on the search keyword in business object. You can either search field that have Full Text search Enabled or Fields which are Key columns. (e.g. Incident number, SR number).
•Object Creation Data Range: executes a search based on the date range.
5. Click Search. The archived data is displayed based on the search criteria.
The Data Archival History tab displays the summary of all the actions taken on your data during the archival process.
To view the data archival history:
1. From the Configuration console, click Build > Extend > Data Archive and Retrieve The Data Archive and Retrieve page appears.
2. Click Data Archival History. The Data Archival History page displays the summarized status of the archival job . This page displays the following information:
| Column | Description |
|---|---|
| Archive Message ID | Specifies the archive message unique ID. |
| Archive BO | Specifies the Business Object for which the archive was run. |
| Archive Status | Specifies the archive status. |
| Remark | Specifies the comments added while archiving the business object. |
| Created By | Specifies the user role who initiated the archival. |
| Archive From Date | Specifies the starting date time period from which data is to be archived. |
| Archive To Date | Specifies the ending date time period up to which data is to be archived. |
| Created Date Time | Specifies the date and time when the archival job is created. |
The Data Purge History tab displays a log of the deleted activities performed on your data, and provides a summary of when and what data was purged.
To view data purge history:
1. From the Configuration console, click Build > Extend > Data Archive and Retrieve. The Data Archive and Retrieve page appears.
2. Click Data Purge History. The Purge History page displays the purged archived business objects. This page displays the following information:
| Column | Description |
|---|---|
| Archive Message ID | Specifies the archive message unique ID. |
| Business Object Name | Specifies the business object name. |
| Purge Status | Specifies the purge status. |
| Remark | Specifies the comments added while purging the archived business object. |
| Purge Data Query Path | Specifies the Azure Blob storage path of a Purge Query for an already-archived data set. The archival record batch count is 100. |
| Completed Date Time | Specifies the date and time when the archived business object was purged. |
The Retrieve Archived Data page supports exporting archived data in standard readable formats. The data columns shown in the report are customizable and can support with advanced filtering and search capabilities.
•Main Table Population: Data is populated based on the search criteria selected in the Business Object (BO) drop-down. Each row contains both a parent and child table, presenting information in a hierarchical structure where dependent records are nested beneath each parent record.
•Customized Column Display: For both the parent and child tables, select the required fields using the Choose Column Display button.
•Export Functionality: Table data can be exported using the Export to XLS/ JSON/ CSV options. User can export a maximum of 10 records.
Exporting the data Grid filters is only applicable for data within the grid.
Supported export options include:
To export selected rows in JSON format:
1. Go to Configuration console and click Build > Extend > Data Archive and Retrieve.
2. On the Data Archive and Retrieve page, select Retrieve Archived Data. Select a business object from the Select BO to Retrieve drop-down list.
3. Specify your search criteria under Search Context. The following search options are supported:
•Keyword: executes a search based on the search keyword in business object. You can search fields that have Full Text search enabled.
•Object Creation Data Range: executes a search based on the date range.
4. Click Search to display archived data based on the selected criteria.
The Column Chooser feature is not applicable for Export to JSON.
5. Select the rows to export and click Apply Selection.
6. [Optional] Use the simple search and advanced search filter options to refine your search criteria.
| a. |
To perform a simple search: Click
 . Select the records from the list that is displayed or enter
the keywords to search the record. A list of records are displayed
based on the search criteria. . Select the records from the list that is displayed or enter
the keywords to search the record. A list of records are displayed
based on the search criteria.
|
| b. |
To perform advanced search: Click
 . A list of operators such as Contains, Does not Contain, Starts
with, Ends with, Equals, and Does not equal are displayed. . A list of operators such as Contains, Does not Contain, Starts
with, Ends with, Equals, and Does not equal are displayed.
|
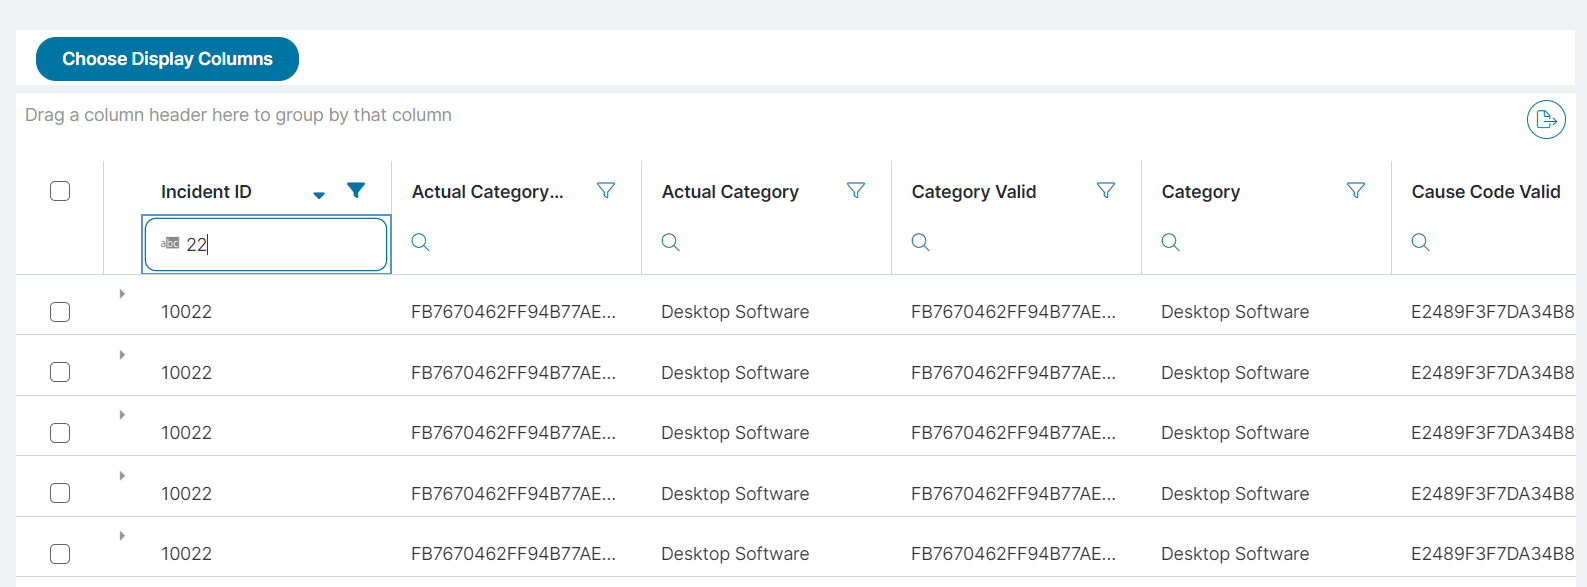
| c. | Select the operator and enter a value. The search records based on the operator selected are displayed. Search results matching the selected operator are displayed. For instance, selecting the Ends with operator for the Incident ID column with a value of 22 will retrieve incidents ending with 22. |
7.
Click
![]() and select the
Export selected rows to JSON option. The
JSON file is downloaded in your system.
and select the
Export selected rows to JSON option. The
JSON file is downloaded in your system.
To export selected rows in XLS format:
1. Go to Configuration console and click Build > Extend > Data Archive and Retrieve.
2. On the Data Archive and Retrieve page, select Retrieve Archived Data. Select a business object from the Select BO to Retrieve drop-down list.
3. Specify your search criteria under Search Context. The following search options are supported:
•Keyword: executes a search based on the search keyword in business object. You can either search field that have Full Text search Enabled OR Fields which are Key Columns. (example. Incident number, SR number).
•Object Creation Data Range: executes a search based on the date range.
4. Click Search to display archived data based on the selected criteria.
5. [Optional] Click Choose Display Columns. The Column Chooser shows all the related BOs which are in relationship with the parent BO selected in tabbed format.
6.To customize the columns to be chosen, navigate to each tab and add/remove the columns you wish to display/hide in the export. By default, the first 10 columns for each BO are exported to the XLS provided that the data is present. A maximum of 10 columns can be chosen for each BO.
7.Clear the related BO names from the respective tabs which should be excluded from export.(except parent BO which will be exported by default.)
8. Select the rows to export and click Apply Selection.
9. [Optional] Use the simple search and advanced search filter options to refine your search criteria.
| a. |
To perform a simple search: Click
 . Select the records from the list that is displayed or enter
the keywords to seacrh the record. A list of records are displayed
based on the search criteria. . Select the records from the list that is displayed or enter
the keywords to seacrh the record. A list of records are displayed
based on the search criteria.
|
| b. |
To perform advanced search: Click
 . A list of operators such as Contains, Does not Contain, Starts
with, Ends with, Equals, and Does not equal are displayed. . A list of operators such as Contains, Does not Contain, Starts
with, Ends with, Equals, and Does not equal are displayed.
|
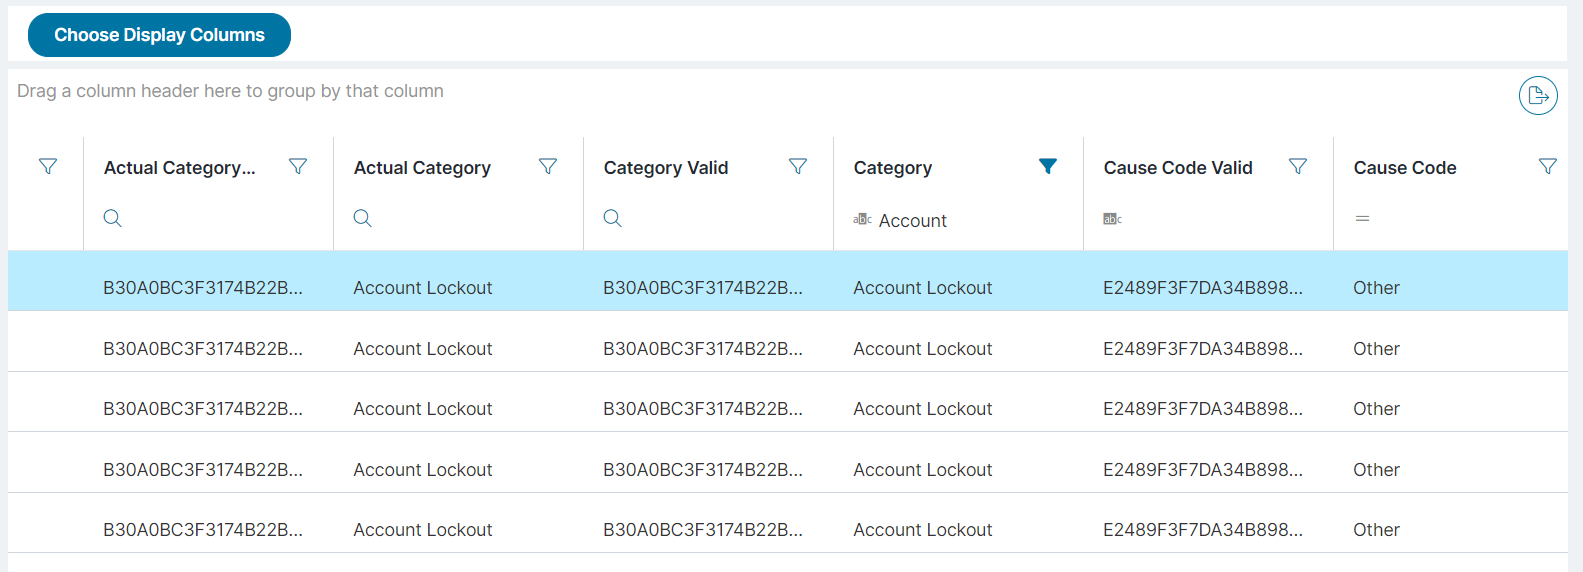
| c. | Select the operator and enter a value. The search records based on the operator selected are displayed. Search results matching the selected operator are displayed. For instance, selecting the contains operator for the Category column with a value of Account will retrieve incidents that contain Account . |
10.
Click
![]() and select the
Export selected rows to XLS option. The
XLS file is downloaded in your system.
and select the
Export selected rows to XLS option. The
XLS file is downloaded in your system.
To export selected rows in CSV (raw) format:
1. Go to Configuration console and click Build > Extend > Data Archive and Retrieve.
2. On the Data Archive and Retrieve page, select Retrieve Archived Data. Select a business object from the Select BO to Retrieve drop-down list.
3. Specify your search criteria under Search Context. The following search options are supported:
•Keyword: executes a search based on the search keyword in business object. You can either search field that have Full Text search Enabled OR Fields which are Key Columns. (example. Incident number, SR number).
•Object Creation Data Range: executes a search based on the date range.
4. Click Search to display archived data based on the selected criteria.
The Column Chooser feature is not applicable for Export to CSV.
5. Select the rows to export and click Apply Selection.
6. [Optional] Use the simple search and advanced search filter options to refine your search criteria.
| a. |
To perform a simple search: Click
 . Select the records from the list that is displayed or enter
the keywords to seacrh the record. A list of records are displayed
based on the search criteria. . Select the records from the list that is displayed or enter
the keywords to seacrh the record. A list of records are displayed
based on the search criteria.
|
| b. |
To perform advanced search: Click
 . A list of operators such as Contains, Does not Contain, Starts
with, Ends with, Equals, and Does not equal are displayed. . A list of operators such as Contains, Does not Contain, Starts
with, Ends with, Equals, and Does not equal are displayed.
|
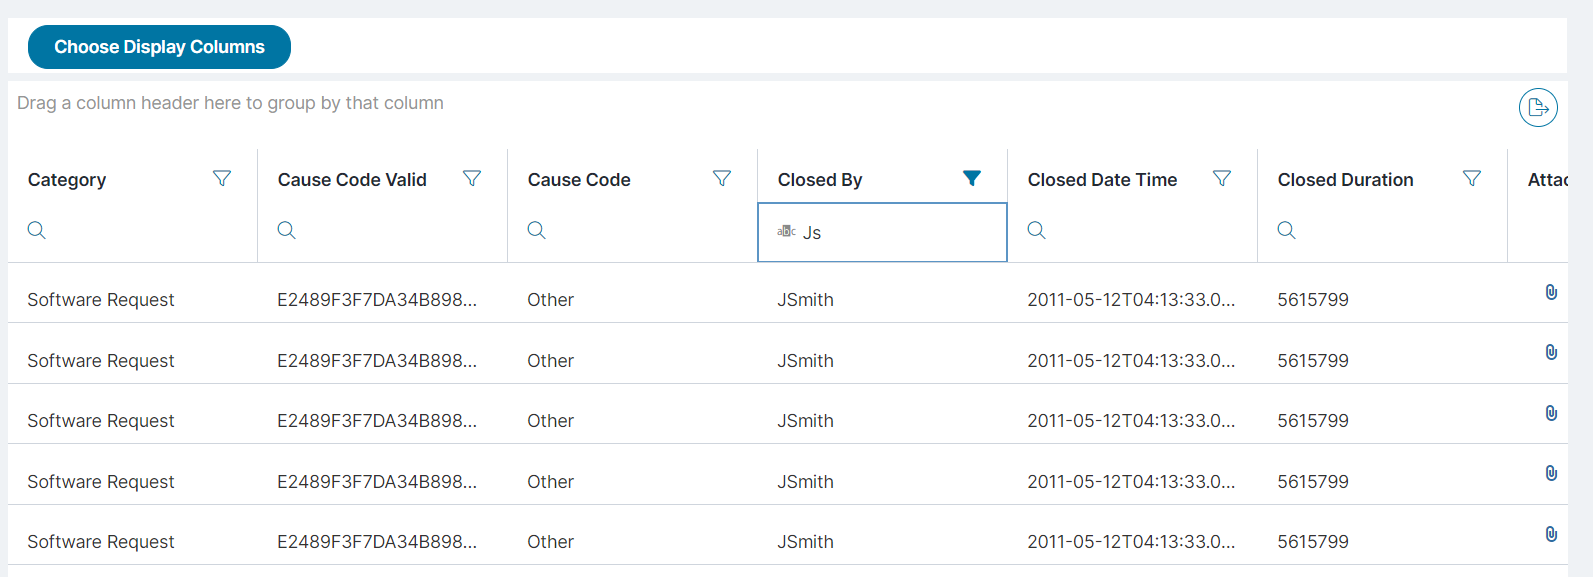
| c. | Select the operator and enter a value. The search records based on the operator selected are displayed. Search results matching the selected operator are displayed. For instance, selecting the Closed By operator for the Closed By column with a value of "JSmith" will retrieve incidents that were closed by "JSmith". |
7.
Click
![]() and select the
Export selected rows to CSV (raw) option.
The CSV file is downloaded in your system.
and select the
Export selected rows to CSV (raw) option.
The CSV file is downloaded in your system.
